Showing posts with label DIY. Show all posts

Friday, May 25, 2012

Happy Memorial Day Weekend!

Ahh three day weekend! Well sort of...I have dance competition tomorrow for one of my studios, but it's a free weekend none the less. So what am I going to spend my weekend doing? Crafts of course, possibly a little bit of Zelda playing and Star Trek marathons too...

So figured I would give you my fave five simple DIYs I found via Pinterest recently, so if you find yourself with some down time, you can give one of these a try. Now I haven't tried any of these yet, so let me know how they go!

FIVE. Beach Towel to Tote


Get ready for some sun, although it takes awhile, this is still pretty simple. Go here.


FOUR. Flat Iron Case


This is the easiest project ever!

Wednesday, May 16, 2012

DIY Signature Stamp

As some of you may remember, I customized some thank you cards. I thought it would be nice to create a signature stamp so I could save my hand a little after writing personal messages inside the 50 cards. I thought this would be a great thing to share for those of you who are also a teacher of some form, recently or soon-to-be getting married, or graduating from high school or college. Signing tons of thank you cards could be more fun with your own stamp.

So all you need is:
speedball linoleum print block
linoleum carving tools
tracing paper
a fine tip Sharpe
and patience.

You can purchase all of that at your local craft store like Michael's or online at websites like Amazon. I'd stick away from art supply online stores unless you plan on buying other art supplies because the shipping can be expensive the products aren't discounted that much. Amazon is your best bet if you're already purchasing something else such a book or etc cause you can get free shipping. I couldn't wait, so I went to Michael's. The speedball linoleum print blocks were on clearance so I was able to snatch a stack of them for $1.50 each, but they're only around $2.99 normally, and you won't use the entire block on your signature so you could make some other small stamps too.

(More after the jump)

Friday, May 4, 2012

DIY Thank you cards

Here's the next DIY.

Recital time is upon me for the studios I work at and my first year of teaching is almost done. I thought it would be nice for me to show my gratefulness for the hard work they've put in by giving them all thank you cards. I luckily found some blank thank you cards on clearance at Target for only $0.88 for 10! So I picked up enough for my 50 students and a couple extras in case I messed up, always have to plan ahead.


I instantly wanted to customize the cards so they had more a personal feel.(Directions after jump)

Thursday, April 26, 2012

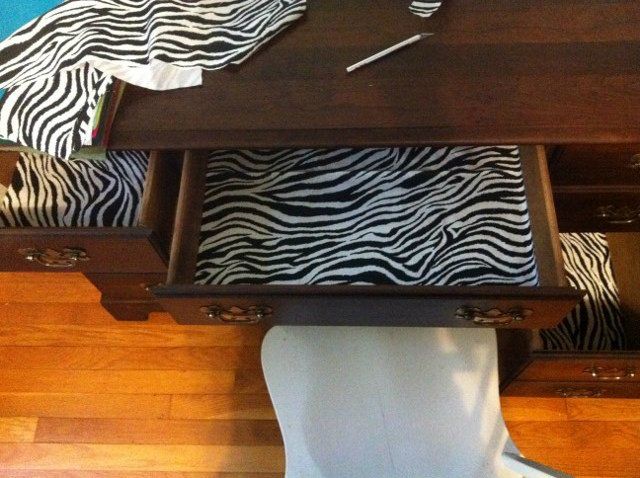
Desk DIY Glam Up Pt. 1

Some of you may know that I recently acquired a new desk which I intended on painting. My parents convinced me since it's made out of such nice wood to leave it be. I can always paint it in the future right? Yeah, that's what I thought too.

Well if I can't paint it, how do I make it my own? Hmmm...oh I know! Besides of the obvious of changing the drawer pulls, which I'm still struggling to find ones that will fit in the pre-cut holes. Then what else, is there to do? I was stuck here too until I found a couple yards of zebra fabric that has been sitting in my closet since high school. *gasp*

I measured the inside of the drawers and (thank the crafting gods) had enough to cover the bottom of every drawer. It's pretty simple. Take the measurements of the drawers and then cut out the fabric in accordance. If you're anything like me though, I can not cut in a straight line. So I slightly over cut every drawer to ensure that I'd have access to trim off after placing inside the drawer. Check out my zebra drawers. =]


What's so great about this is that I didn't tack it down or attach it to cardboard, so I can take it to change it up whenever I want...(there's more after the jump!)

Saturday, April 21, 2012

DIY Ahh-tempt: Ombre Chair

I don't know how many of you are on Pinterest, I'm addicted, but I am always finding fun DIY projects and inspirational photos of things I want to make. Once such thing was this post fon Design Sponge originally from The Divine Minimalist by Jesse.

http://www.designsponge.com/2012/04/diy-project-shades-of-blue-ombre-chair.html#more-133390
Jesse's beautiful creation.

Talk about a cool and simple project idea. Simple in concept at least. After the jump is the full process I went through. Overall I'd rate this DIY a 3 on a 1 to 5 scale of difficulty with 5 being pretty hard. I'm fairly confident that anyone could do this project. Between the sanding and dry time, it does take willpower to finish the project without rushing just to get to the end product. If you have a day off from work or you're having a lazy day, enjoy the sunshine in between stages of the sanding, painting and drying.